We discussed previously how we settled on a design concept for our demo imaging system. To recap,...
At QUEL Imaging, we help teams build, optimize, and verify their fluorescence imaging systems for clinical applications with rigorously characterized tissue-mimicking optical phantoms.
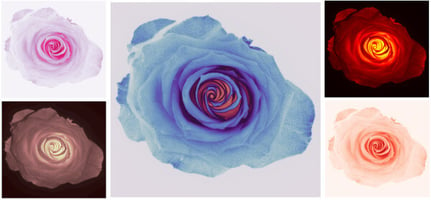
 One of the challenges with fluorescence guided surgery - specifically with near infrared fluorescence - is that you can’t really see it without specialized equipment. Our eyes are not sensitive to the NIR where the major clinical fluorophores like ICG fluoresce. This makes it challenging for us, and our customers, to easily see the value of the tools we’re building.
If you’re reading this, you may already be well-versed in the world of fluorescence, but you also likely know how difficult it can be to explain the concepts to family, friends or maybe executives? But once you show them the power to see in the NIR, to see through tissue, to show perfusion, to find cancerous tissue hidden beneath tissue, the value becomes clear.
Our goal is to accelerate clinical NIRF technology adoption and a powerful demonstration can go a long way. We believe there is a lot of this potential for new technologies in this field. Our optical phantoms are designed to help at every stage of clinical translation, from early development, to marketing and user training. To help shape this narrative, and prove we’re not just selling fancy blocks of plastic with invisible features, we decided we needed to build a portable fluorescence imaging system we could bring on the road with us.
We wanted to share our development process, as it may be beneficial to others just getting into the field. Here, we will walk through our product realization process starting with defining user needs and design constraints. We will periodically revisit these concepts and show how to use our reference targets to characterize and improve imaging performance. We expect this will provide you with a practical framework to adapt to your own imaging system development needs.
The Problem
There is a limit to how much information can be conveyed with a poster or marketing flyers. Fluorescence imaging is a highly technical, but highly visual concept. Ultimately, we needed a way to physically demonstrate the value of our reference targets.
So as any good engineering team might do, we decided to build something. Namely, a demo NIR fluorescence imaging system to easily demonstrate the features of our phantom and tools.
Defining Requirements for the MVP
We had a clear sense of what this imaging system needed to accomplish, but like any device development project, the requirements needed to be specific enough to guide design decisions while leaving room for practical tradeoffs.
We knew what we really needed:
- Simple, real-time NIR fluorescence images without jeopardizing anyone’s safety (no lasers)
- ICG Compatibility: ICG is the most widely used clinical fluorophore, and ICG phantoms are a large part of our product portfolio.
- Budget-conscious: We wanted to start with existing components that we had available around our R&D lab, to try to keep purchases of new items under $1000
- Professional appearance: the system needed to look like a refined product concept, not a lab prototype with a rat’s nest of cables running from the command line.
- Conference-ready: It needed to be standalone, compact, transportable, and operable from a battery pack all day. Ideally, not requiring an external computer to control.
Just as important was understanding what we did NOT need but might consider expanding upon down the road.
- Live NIRF video playback: saving development time and target photostability
- Single-photon sensitivity: Saving space and cost constraints without seriously sacrificing performance.
- Quantitative image analysis compatibility: saving development time
- Ultrawide field of view: saving design and development time. We just wanted to show that our phantoms really were fluorescent.
- Automated contrast adjustment: Keeping contrast adjustment manual minimizes troubleshooting in the field and development time.
- Multispectral illumination and imaging capabilities: to save size and cost while still showing the value of our products.
With this in mind, we hit the ground running with technical requirements.
Core Requirements
Luckily we’ve done this before. So he had a good sense of where to start.
Hardware needs:
- NIR-sensitive camera capable of capturing fluorescence images
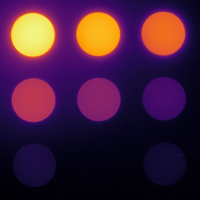
- Integrated NIR excitation (700-790nm range) - ideally incoherent to avoid laser safety risks at public trade shows.
- Simple and robust software control for image capture, illumination, and image display
- Compact, battery-friendly form factor for air travel and field deployment.
- Fully-contained system with a small mechanical footprint, integrated display, with minimal external cabling
- No need for 120V line power - outlets at trade shows are shockingly expensive…
Software needs:
- Compatible with existing camera APIs used in our internal development
- Simple, robust graphical user interface (GUI) for image capture
- Toggled illumination control (to reduce thermal load and photobleaching)
- Still image capture (video would be nice to have, but not required)
- Stable, simple backend that's easy to maintain and extend
- Manageable cybersecurity exposure
Design Concept
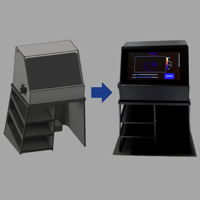
After some back-and-forth internally, we settled on a design concept and mockup that satisfied most of our needs:
The concept lets us acquire and display NIR fluorescence images in a compact, low-power, and portable manner that won't get us stopped by TSA or risk blinding prospective customers. We even ended up adding some simple mechanical features to shield our phantoms from environmental stray light and added some shelves to display our phantoms and optimize limited space available at trade shows.
But there’s a lot more to the story. We needed to find the right components, figure out how to package them, and develop a software system for seamless demonstrations. And there is a lot more to optimize. Check back again soon as we dive deeper into our design decisions and how we aim to characterize and improve system performance.
If you need help designing and characterizing your imaging system, reach out to see if our team can help!